Intro
In this post, I’m going to explain how to connect a WS2801 RGB-LED-strip to the RPi 4B and Apple HomeKit.
I’m writing this during the 2020 Covid-19 quarantine. I had lots of time to spend, obviously, so I started this project. It started as a simple wood project and then I wanted to add passive background lighting to the wooden object.
This is the tech stack we’re going to use (abstract to concrete):
I will not explain how to setup Raspbian on the RPi itself, so this post presumes, this has already been done. If you don’t know how to setup Raspbian on your device, take a look here.
Also, this article presumes basic knowledge of Linux (i.e. Raspbian).
RPi & WS2801
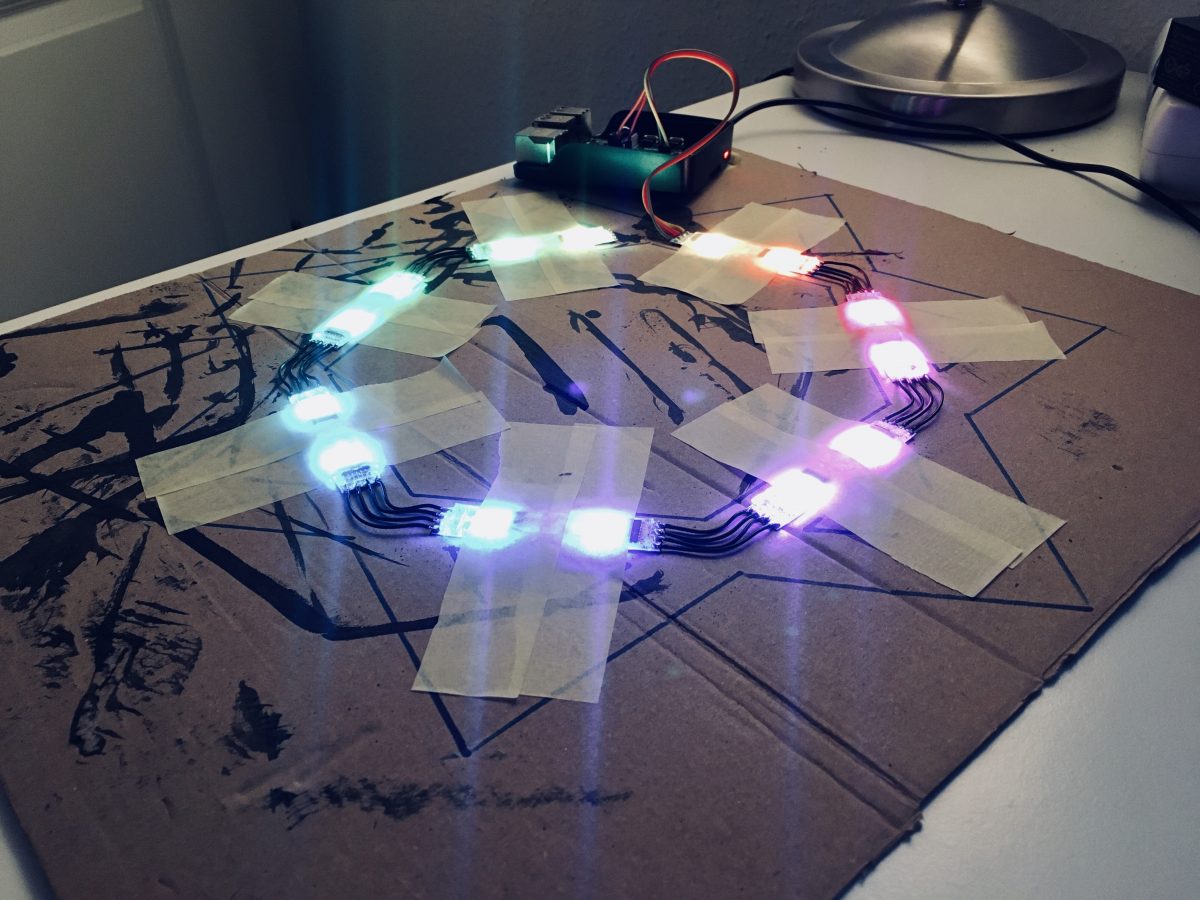
The WS2801 type LED strips have 4 connections: +5V, gnd, clock and data. Individual LEDs are addressable.
A word on current
A single RGB-LED of the WS2801 needs 60mA of current, tops. If the amount of LEDs you want to use exceeds a certain amount of current, you will need to power the LEDs with an external 5V power supply. I only have 14 LEDs (840mA), so I was able to power them with USB or from the +5V pad directly without damaging the RPi. I measured them in full bright white mode and they drew 600mA.
Wiring up
Check Pinout for the actual GPIOs of your device. There’s also a command line tool for raspbian to display the layout (apt-get install hwb). The following pins are those of the model 4B.
+5V => +5V (04)
CK  => SCLK (23)
SI  => MOSI (19)
GND => GND (06)
If you have lots of LEDs, connect the +5V to your external power supply.
Setup RPi
We want to use the RPi’s SPI bus for this operation, so we need to enable it in the OS, by using raspi-config. Navigate to Interfacing Options and enable SPI. You should now have new devices /dev/spidevX.X.
Python & WS2801
The new Adafruit PythonCircuit based lib for WS2801 is based on python 3, so I will focus on that. It works with Python 2, as well, though, it’s just … deprecated.
apt-get install python3-pip
pip3 install adafruit-circuitpython-ws2801
Try it with the following test script.
#!/usr/bin/python3

import board
import adafruit_ws2801
import time

def all_off(leds):
    all_set(leds, (0,0,0))

def all_on(leds):
    all_set(leds, (255,255,255))

def all_set(leds, color=(255,255,255)):
    leds.fill(color)
    leds.show()

# adafruit_ws2801.WS2801(clock, data, nleds)
leds = adafruit_ws2801.WS2801(board.SCLK, board.MOSI, 14)

all_on(leds)
time.sleep(3)
all_off(leds)
Take a sip from the Flask
Flask is a lightweight framework for building web services and APIs. We will use it, to provide control over our LEDs via a simple API. Flask essentially routes web requests to python methods, in a nutshell that is.
apt-get install python3-flask
#!/usr/bin/python3

import flask
from flask import jsonify
from flask import request
from binascii import unhexlify

import board
import adafruit_ws2801

# func for hex str to rgb conversion
def hex_str_rgb(hstr):
    uh = unhexlify(hstr)
    return [ int(x) for x in list(uh) ]

# func for rgb to hex str conversion
def rgb_hex_str(rgb):
    return "%02x%02x%02x" % (tuple(rgb))

# led strip item
class RgbHepta:
    def __init__(self):
        # adafruit_ws2801.WS2801(clock, data, nleds)
        self.leds = adafruit_ws2801.WS2801(board.SCLK, board.MOSI, 14)
        self.last = (255,255,255)
        self.ison = 0

    def on(self):
        print(self.last)
        self.set_rgb(self.last)
        self.ison = 1
        return jsonify(1)

    def off(self):
        self.set_rgb((0,0,0))
        self.ison = 0
        return jsonify(0)

    def set(self, hexstr):
        rgb = hex_str_rgb(hexstr)
        self.set_rgb(rgb)
        return jsonify(hexstr)

    def set_rgb(self, color=(0,0,0)):
        if color != (0,0,0):
            self.last = color
        self.ison = 1
        self.leds.fill(color)
        self.leds.show()

    def is_on(self):
        return jsonify(self.ison)

    def get_color(self):
        hx = rgb_hex_str(self.last)
        return jsonify(hx)

# the flask app
app = flask.Flask(__name__)

# the led heptagram
hepta = RgbHepta()

# dispatcher for the heptagram
@app.route("/api/v1/hepta/<path:cmdstr>", methods=['GET','POST'])
def action(cmdstr):
    cmdv = cmdstr.split("/")
    cmd  = cmdv[0]

    if cmd == "on":
        return hepta.on()
    elif cmd == "off":
        return hepta.off()
    elif cmd == "status":
        return hepta.is_on()
    elif cmd == "set":
        if len(cmdv) > 1:
            return hepta.set(cmdv[1])
        else:
            return hepta.get_color()
    else:
        msg = "Unknown command: %s." % cmd
        sys.stderr.write(msg)
        return jsonify(msg)

# main()
if __name__ == "__main__":
    app.run(host='0.0.0.0', port=80, debug=True)
The class RgbHepta encapsulates the led object as well as the LEDs’ state and last chosen color. The action method is what will be invoked whenever someone requests http://localhost/api/v1/hepta/[on,off,status]. As you can see, I’m simply dispatching those calls to the RgbHepta object.
The results and method names are an anticipation of what comes next, Homebridge.
Homebridge
Homebridge is a lightweight server based on NodeJS, implementing the API of Apple’s HomeKit. So Homebridge basically enables us to connect anything to HomeKit.
After you login to the web UI, homebridge will display a QR code. You can scan this code from the HomeKit App and it’ll add the bridge, so we can then do things with it.
We’ll use the better-http-rgb plugin to connect homebridge with flask. Here’s the config for homebridge:
{
            "accessory": "HTTP-RGB",
            "name": "HeptaRGB",
            "service": "Light",
            "switch": {
                "status": "http://localhost:80/api/v1/hepta/status",
                "powerOn": "http://localhost:80/api/v1/hepta/on",
                "powerOff": "http://localhost:80/api/v1/hepta/off"
            },
            "color": {
                "status": "http://localhost:80/api/v1/hepta/set",
                "url": "http://localhost:80/api/v1/hepta/set/%s"
            }
}
Just in case you’re wondering, the %s for the color will be passed as a simple six digit hexadecimal string representing the RGB color to be set (no prepended ‘#’).
Running it as a Daemon
Running the flask script as a daemon is fairly simple. All we need is a systemctl service config.
Create a new file /etc/systemd/system/<service>.service (replace <service> with your own service’s name) with the following content.
[Unit]
Description=<a description of your service>
After=network.target

[Service]
User=<username>
WorkingDirectory=<path to your app>
ExecStart=<app start command>
Restart=always

[Install]
WantedBy=multi-user.target
Then, reload systemd, enable the service and finally, start it.
$ sudo systemctl daemon-reload
$ sudo systemctl enable <service>
$ sudo systemctl start <service>